Colour me Confetti: TPT GUIDE
Mostrando entradas con la etiqueta TPT GUIDE. Mostrar todas las entradas

sábado, 1 de septiembre de 2018

Guía TpT Guide ♥ 6

septiembre 01, 2018 0
Guía TpT Guide ♥ 6

¡Hola, confettis!
Aquí os explicaba cómo diseñar vuestros materiales pero... ¡queda lo principal! ♥ Empezar a compartir materiales ♥ Y de ello es de lo que vamos a hablar hoy. Ya veréis que es ¡superrápido y sencillo!

Hello, confettis!
Here I explained how to design your own printables but... we're missing the main thing! ♥ Starting sharing resources ♥ And that's what we are going to talk about today. You'll see how fast and easy it is!

1. Formato / File Types

Primero de todo, tenemos que tener en cuenta que TpT acepta los siguientes formatos:
avi, bmp, bnk, doc, docx, dot, epub, exe, flp, flipchart, flv, gif, htm, html, ink, jpeg, jpg, key, knt, mov, m4a, m4v, mp3, mp4, png, mpeg, mpg, mv4, notebook, ods, pdf, pps, ppsx, ppt, pptx, pub, ram, rm, rtf, swf, tif, tiff, txt, wav, wpd, wmv, xls, xlsx, xlt, xltx, zip


First of all, we have to take into account that TpT supports the following file types:
avi, bmp, bnk, doc, docx, dot, epub, exe, flp, flipchart, flv, gif, htm, html, ink, jpeg, jpg, key, knt, mov, m4a, m4v, mp3, mp4, png, mpeg, mpg, mv4, notebook, ods, pdf, pps, ppsx, ppt, pptx, pub, ram, rm, rtf, swf, tif, tiff, txt, wav, wpd, wmv, xls, xlsx, xlt, xltx, zip

Lo normal es subir actividades en los siguientes formatos:
The usual thing is to upload the activities as a:

♥ PDF: en el caso de que sea un material imprimible, así se evita que el diseño cambie o los elementos se muevan. ¿Cómo se guarda un Word o un PowerPoint en PDF? Tenéis que ir a "Archivo", luego a "Guardar como", seleccionar el formato PDF y, por último, darle a "Guardar".
♥ PDF in case it's a printable, that way we avoid the design changes or that the elements move around. How do we save a Word or a PowerPoint as a PDF? You have to go to "File", then "Save as", select PDF and, finally, click on "Save".

♥ PPT (PowerPoint): si se trata de un material editable (como pueden ser, por ejemplo, etiquetas) lo recomendable es hacer un PPT en el que el fondo no pueda ser editado (como una imagen) pero sí se pueda escribir encima de él (con cuadros de texto).
 PPT (PowerPoint) if it's an editable resource (for example, labels) it's advisable to make a PPT in which the background can't be changed (like an image) but text can be added (with a text box).
♥ ZIP: si queremos subir una carpeta con varios archivos, tendremos que pasar la carpeta a formato .zip. ¿Cómo se hace? Pinchando con el botón derecho sobre la carpeta, yendo a "Enviar a" y luego pinchando en "Carpeta comprimida (en zip)". ¿En qué ocasiones necesitamos subir una carpeta? Si queremos subir lo que se llama bundle (lote), es decir, un conjunto de recursos. Un ejemplo podría ser un bundle de decoración de aula en el que incluyáis varios elementos que cumplan ese propósito. También puede ser de actividades de multiplicación, de comprensión escrita...
♥ ZIP if we want to upload a folder with various files, we will have to save the folder as a .zip. How do we do that? Click on the folder with the right button, go to "Send to" and then click on "Compressed (zipped) folder". When do we need to upload a folder? If we want to upload a bundle, that is, various resources in one file. An example could be a bundle for decorating your classroom in which you can include various files that serve that purpose. It could also be a bundle of multiplication activities, written comprehension...
Si queréis subir vídeos, deberéis tener la "Premium Seller Account".
If you want to upload videos, you will have to have a "Premium Seller Account".

2. Subir un recurso / Upload a product

Cuando tengamos listo aquello que queremos subir, tendremos que ir a nuestro "Dashboard" para comenzar y luego pinchar en "Add New Product".
Once we have ready the product we want to upload, we will go start by going to our "Dashboard" and then we will click on "Add New Product".


Después, deberéis escoger qué tipo de recurso vais a subir. Si es un PDF, PPT, ZIP... deberéis pinchar en "Upload Resource". Si tenéis cuenta Premium y queréis subir un vídeo, deberéis escoger la otra opción.

Afterwards, you will have to choose what type of fyle you are going to upload. If it's a PDF, PPT, ZIP... you will have to click on "Upload Resource". If you have a Premium account and want to upload a video, you will have to choose the other option.

Ahora toca subir los materiales y rellenar toda información sobre ellos:
CAPTURAS DE PANTALLA MÁS ABAJO
1. Title: escribe el nombre de tu material.
2. Description: incluye la descripción de tu material: qué es lo que compartes, para qué sirve, ideas de cómo utilizarlo...
3. Files: sube el archivo de tu ordenador. Ya sea un documento o un vídeo, puedes subir una vista previa del mismo para que la gente se haga una idea de lo que compartes.
4. Thumbnail Images: deja que TpT cree una imagen que represente tu recurso, sube la tuya propia o déjalo para más tarde.
5. Price: escoge si tu recurso será gratuito o de pago. En el caso de haber escogido "de pago", fija el precio. 
Multiple Licenses: fija un descuento por si alguien compra varias licencias de tu actividad.
Bundle Discount Price: si es un conjunto de otros materiales que ya has subido individualmente, puedes marcar un precio de descuento.
6. Categories: 
Resource Type: selecciona y pasa a la derecha con las flechas tres palabras que expliquen qué es tu recurso (un póster, una actividad, un instrumento de evaluación...).
Grade Level: escoge los cursos a los que va dirigido tu recurso. Si sirve para todos pincha en "Not Grade Specific".
Subject Area: después del curso, escoge la asignatura en la que se utilizaría.
Common Core State Standards: puedes seleccionar los estándares que se trabajan con tu material.
Teaching Duration: escoge la duración de la actividad (desde 30 minutos a toda la vida).
Number of Pages or Slides: escribe el número de páginas o diapositivas que incluye tu material.
Answer Key: di si incluye una hoja de soluciones en el caso de que se necesiten en tu actividad.
7. Copyright: SUPERIMPORTANTE Para proteger tu trabajo y el de los demás, deberéis marcar si vuestra creación es 100% original vuestra (incluyendo fuentes de texto, imágenes, marcos...) o si contiene elementos con copyright pero tenéis permiso para utilizarlos (en el caso de que hayáis sacado las fuentes, imágenes, marcos... de otr@s creador@s).
8. Make Product Active: pincha en el cuadradito si quieres que tu recurso sea público y aparezca en búsquedas.

Pincha en "Create Product" y...¡listo! Tu actividad ya está disponible para ser descargada.
________________________________________________

Now it's turn to upload your resources and complete all the information about them:
SCREENSHOTS DOWN BELOW
1. Title: write the name of your product.
2. Description:  include a description of your product: what are you sharing, what do you use it for, ideas on how to use it...
3. Files: upload your activity from your computer. Whether it's a document or a video, you can upload a preview for people to see what they will find in it.
4. Thumbnail Images:  let TpT create an image for your product, upload your own or leave it for later.
5. Price: choose if your product is free or paid. If you chose paid, set the price.
Multiple Licenses: set a discount in case someone buys multiple licenses of your product.
Bundle Discount Price: if your product if a bundle, you can set a discount price.
6. Categories: 
Resource Type: select and move to the right side using the arrows three words that explain what is your product (a poster, an activity, an assessment tool...).
Grade Level: pick the grades your product aims at. If it can be used for every grade, click on "Not Grade Specific".
Subject Area: after picking the grade, chooe the subject you could use your product for.
Common Core State Standards: you can select the standards it works on.
Teaching Duration: pick the duration of your activity (from 30 minutes to a lifelong tool).
Number of Pages or Slides: write the number of pages or slides your product includes.
Answer Key: explain if it includes an answer key in case you need it for the activities.
7. Copyright: SUPER IMPORTANT In order to protect your work and others', you must choose whether your activity is 100% your original work (including text fonts, images, frames...) or if it contains copyright elements but you have permission to use them (in case you've included fonts, images, frames... from other creators).
8. Make Product Active: click on the little square if you want your product to be live on the site and searchable.

Click on "Create Product" and...done! Your activity is ready to be downloaded.


  ¿Habéis subido ya vuestros materiales a TpT?
                   Have you already uploaded your resources to TpT?

domingo, 26 de agosto de 2018

Guía TpT Guide ♥ 5

agosto 26, 2018 0
Guía TpT Guide ♥ 5

¡Hola, confettis!
Aquí os explicaba cómo personalizar vuestra tienda. Ahora toca responder a la pregunta del millón: cómo elaboro mis materiales. La respuesta es simple y el diseño muy sencillo, pero sí que suelo seguir una serie de pasos para asegurarme de que todos mis recursos tienen mi "toque", la imagen con la que yo estoy contenta.

Hello, confettis!
Here I explained how to personalise your TpT shop. Now it's time to answer the million dollar question: how I design my resources. The answer is simple and the design very easy, but it's true that I usually follow certain steps for making sure all of my printables have my "touch", the image I'm happy with.

1. PowerPoint

Todos mis materiales, actividades, imprimibles, posters, imágenes de perfil... TODO está hecho con PowerPoint. Antes de compartir mis materiales por aquí, utilicé Canva en algunas ocasiones, pero al final, a la hora de hacer distintos recursos y querer que siguiesen un mismo diseño, me decidí por PowerPoint.
Para mí es súper intuitivo, puedes utilizar un montón de fuentes, añadir imágenes y moverlas fácilmente, ofrece una gama cromática infinita... ¡Lo que yo pido!
All of my resources, activities, printables, posters, profile pictures... EVERYTHING is made using PowerPoint. Before sharing my resources online, I used Canva a couple of times, but in the end, when it came to making various documents and wanting them to follow a certain design, I went with PowerPoint.
For me it's super intuitive, you can use a lot of fonts, add and move images around easily, it offers an infinite colour range... Everything I ask for!

2. Colores / Colours

Otra de las claves a la hora de diseñar materiales es que todos sigan una misma gama de colores. Los que yo utilizo, como ya sabéis, son los colores del arcoíris. Eso sí, siempre escojo el mismo rosa, el mismo verde... para asegurarme de que todos los imprimibles tienen el mismo tema y que cuando los coloque en mi aula todo va a quedar homogéneo (la organización es real).
Another key when designing products is that everything follows the same colour scheme. The ones I use, as you know, are the rainbow colours. Plus, I always use the same pink, the same green... so as to make sure every printable has the same theme and that when I place them in my classroom everything is going to be homogeneous (the organisation is real).

3. Dibujos / Cliparts

¡Qué sería de un imprimible si no fuese por los dibujillos cuquis! Para mí los dibujos (cliparts) son la perdición. Hay tantos y TAN bonitos... Pero, como todo, tengo un filtro para escoger los que más me gustan. Mis favoritos son los de Krista Wallden - Creative Clips (encuéntralos aquí) y, si ahí no encuentro lo que busco, pues voy mirando por TpT a ver qué hay pero, el 90% de las ocasiones, Krista ya ha diseñado lo que pido.
What would a printable be without some cute clipart! For me cliparts are my guilty pleasure. There are so many and SO pretty... But, as always, I have a filter for choosing the ones I like the most. My favourite ones are by Krista Wallden - Creative Clips (find them here) and, if I don't find what I'm looking for there, I'll go through TpT seeing what I can find but, 90% of the times, Krista has already designed what I wanted.

4. Hazlo tuyo / Make it yours

En la mayoría de mis recursos suelo colocar confetti, ya sea como esparcido por toda la hoja o colocado en fila a modo de acento para el título, todo depende de lo que esté diseñando. Utilizo los mismos colores que empleo en marcos, fondos, texto... para seguir con la gama que os comentaba (¡cómo no!). También he visto profes que incluyen siempre cactus, flamencos, lápices... para lo que os decía antes, seguir una misma línea en todo lo que suben.
In most of my resources I normally place confetti, whether it's spread throughout the page or creating a line under the title as an accent resource, depends on what I'm designing. I apply the same colours I use in frames, backgrounds, fonts... for keeping up with the range I was telling you before (of course!). I've also seen teachers that always include cacti, flamingos, pencils... with the purpose of having everything in the same line.

5. Copyright

Punto SÚPER IMPORTANTE, coloco siempre mi nombre, el símbolo de Copyright (©) y el año en mis materiales con el fin de evitar que alguien se apropie indebidamente de mi trabajo. Esto es algo que recomiendo siempre a cualquier profe, comparta sus recursos por Internet o no, porque no es el primer caso que he escuchado en el que una persona distribuye material online, reparte fichas o decora su aula con recursos de otra persona como suyos.
Colour me Confetti © 2018
SUPER IMPORTANT element, I always place my namethe Copyright symbol (©) and the year in my resources with the aim of avoiding the misappropriation of my work. This is something I always recommend to any teacher, whether they share their activities online or not, because it's not the first case I've heard where a person has distributed activities online, handed out worksheets or decorated their classroom using somebody else's resources as their own.


6. Terms of Use page / Página de Condiciones de Uso

Por último, aseguraos de incorporar una página de Condiciones de Uso donde coloquéis toda la información que la gente necesita para utilizar vuestras actividades y asegurar que vuestro trabajo está protegido. Aquí os dejo algunas sugerencias de lo que podéis incluir:
♥ Gracias: dad las gracias a la gente por la descarga y desead que lo disfruten.
♥ Condiciones de Uso: explica exactamente qué pueden hacer y qué no con tu producto.
♥ Dónde encontrarte: incluye tus redes sociales y una forma de contacto en caso de que identifiquen un error.
♥ Créditos: si has utilizado cliparts y/o fuentes que han sido diseñados por otra persona, asegúrate de agradecérselo añadiendo su logo y un enlace a su página.
♥ Recursos que te pueden interesar: puedes insertar enlaces a otros productos que tengas subidos y que ¡les pueden resultar útiles!

Lastly, make sure you incorporate a Terms of Use page where you lay out all the information people need to know in order to use your activities and ensure your work is protected. Here are some suggestions of what you can include:
Thank You: thank people for the download and wish them they enjoy your product.
 Terms of Use: explain exactly what they may or may not do with your product.
 Where to find you: add your social media links and a way to contact you in case they have spotted any mistakes.
 Credits: if you used clipart and/or fonts that have been designed by someone else, make sure to give credit to them by including their logo and a link to their page.
 Resources you may like: you can also list other products you have available that people may enjoy!

*
¡Hasta aquí el paso 5! En el paso 6 os explicaré cómo subir materiales a vuestra tienda y añadir una descripción sobre ellos, así como su imagen representativa.

That's all for step 5! In step 6 I will explain how to upload activities to your shop and add a description, as well as its thumbnail image.

  ¿Cómo elaboráis vuestros materiales?
                      How do you design your resources?

viernes, 24 de agosto de 2018

Guía TpT Guide ♥ 4

agosto 24, 2018 0
Guía TpT Guide ♥ 4

¡Hola, confettis!
Ahora que ya tenemos nuestra cuenta de TpT Seller (ver cómo aquí), aprenderemos a personalizar nuestra tienda para que nos represente y se ajuste a la estética que nos gustaría tener.

Hello, confettis!
Now that we have our TpT Seller acount (see here how), we will learn how to personalise our shop so that it represents us and adjusts to the aesthetic we would like to have.


Hay 6 elementos clave a tener en cuenta cuando personalicemos nuestra tienda:
1. Shop name: el nombre de tu tienda.
2. Profile Picture: foto de perfil.
3. Personal Quote / Image: la frase o imagen personal que aparecerá al lado de tu foto de perfil.
4. Leaderboard: la imagen principal que aparecerá encima de todos los recursos que tengas disponibles.
5. Column Banner: la imagen ubicada al final de la columna de la izquierda.
6. Thumbnail Images: la foto representativa de cada recurso que subas.

There are 6 key elements we have to consider when personalising our shop:
1. Shop Name.
2. Profile Picture.
3. Personal Quote / Image: the quote or the image you will find next to your profile picture.
4. Leaderboard: the main image that will appear on top of all your uploaded resources.
5. Column Banner: the picture located at the end of the column on the left side of your page.
6. Thumbnail Images: a representative picture of each of your available products.


1. Diseño / Design

A la hora de diseñarlos, cada un@ puede dar rienda suelta a su imaginación, utilizar distintos colores, tipos de letra... ¡Como queráis!
¿Cómo los diseño? Yo utilizo PowerPoint para todo (imágenes, frases, banners, diseño de recursos...) pero si estáis familiarizad@s o queréis experimentar con otros editores como Canva, Photoshop, PicMonkey... ¡a por ello!

When it comes to designing them, you can unleash your creativity, use different colours, fonts... however you'd like!
How do I design them? I use PowerPoint for everything (pictures, quotes, banners, design resources...) but if you're familiar or want to experiment with other editors like Canva, Photoshop, PicMonkey... go for it!

2. Edit Shop Name, Profile Picture & Personal Quote / Image:

Si queremos editar el nombre de nuestra tienda, nuestra imagen de perfil y la frase o imagen personal, deberemos ir a "Dashboard".

If we want to edit the name of our shop, our profile picture and our personal quote / image, we will have to go to "Dashboard".


Una vez aquí, tendrás que pinchar en "Edit Profile".
Once your here, you will click on "Edit Profile".


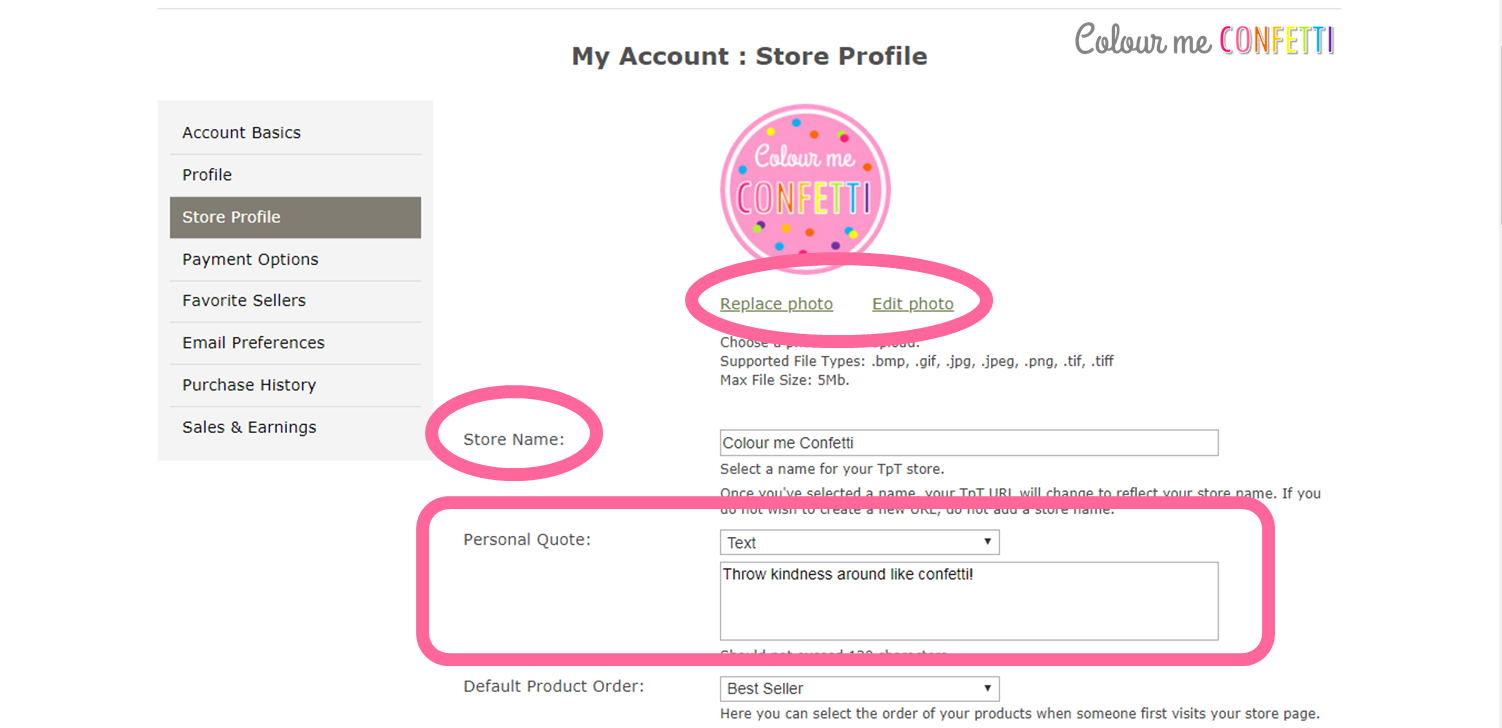
Si quieres cambiar o editar tu foto de perfil deberás pinchar en "Replace photo" o en "Edit photo". Para cambiar el nombre de tu tienda, escríbelo donde dice "Store Name". Si quieres poner una frase o imagen personal, deberás escribirla o subirla donde dice "Personal Quote" (si quieres subir una imagen cambia "Text" por "Image/Link".

If you want to change or edit your profile picture you should click on "Replace photo" o "Edit photo". For changing your shop name, type it in where it says "Store Name". If you want to place a personal quote or image, you have to write it or upload it where it says "Personal Quote" (if you want to upload an image change "Text" for "Image/Link".


3. Edit Leaderboard & Column Banner

En el caso de querer editar la imagen que aparece encima de tus recursos o la que aparece en la columna, una vez en el "Dashboard", deberemos pinchar en "Marketing" y luego en "CUSTOMIZE".

In case we want to edit the Leaderboard or the Column Banner, once we are in the "Dashboard", we will click on "Marketing" and then on "CUSTOMIZE".


Aquí seguiremos el mismo proceso para ambas, seleccionando la imagen que queramos de nuestro ordenador, poniéndole un link a la foto (la web nos pone el enlace de nuestra tienda por defecto) y pinchando en "SAVE".

We will follow the same process for both, selecting the picture we want from our computer, putting our page link to the image (the web places your shop one as a default link) and clicking on "SAVE".


¡Hasta aquí el paso 4! En el paso 5 os explicaré cómo diseño mis materiales para mi tienda (editor, colores, dibujos...).

That's all for step 4! In step 5 I will explain how I design activities for my shop (editor, colours, cliparts...).
  ¿Has personalizado ya tu tienda TpT?
                     Have you personalised your TpT shop?

miércoles, 22 de agosto de 2018

Guía TpT Guide ♥ 3

agosto 22, 2018 2
Guía TpT Guide ♥ 3

¡Hola, confettis!
Ya hemos hablado de qué es Teachers Pay Teachers (aquí) y de cómo descargar materiales (aquí) pero, ¿y si queremos compartir nuestras actividades? Hoy os voy a enseñar cómo convertirse en "TpT Seller" y compartir nuestros materiales, ya sea de forma gratuita o de pago.

Hello, confettis!
We've already talked about what Teachers Pay Teachers is (here) and how to download resources (here) but, what if we want to share our own activities? Today I'm going to show you how to become a "TpT Seller" and share our activities, whether they are free or paid.

1. Crea tu cuenta / Create your account

Lo primero es crear tu cuenta de TpT. Hay dos opciones:

a) Si no tienes cuenta ya en TpT y quieres abrir una directamente como vendedor/a, deberás seguir los pasos explicados aquí y, al llegar a la elección del tipo de cuenta, deberás elegir "Basic Seller Account" (gratuita). También puedes escoger la "Premium Seller Account" con un coste de $59.95 al año y que te permitirá recibir un mayor porcentaje de tus ventas. Lo que yo recomiendo es empezar con la "Basic" y luego ya, en base a las descargas y ventas que tengáis, cambiar a "Premium".

First of all, you have to create a TpT account. There are two options:

a) If you don't already have a TpT account and you want to open one as a seller, you will have to follow the steps explained here and, when choosing the type of membership, you will have to go for the "Basic Seller Account" (free). You can also choose the "Premium Seller Account" which price is $59.95 annually and that will allow you to receive a higher payrate. What I recommend is starting with the "Basic" and then, based on your downloads and sales, change to "Premium".


TPT SE QUEDARÁ CON UN PORCENTAJE DE TUS VENTAS: 45% si eres "Basic Seller" y 20% si eres "Premium Seller".
TPT WILL KEEP A PERCENTAGE OF YOUR SALES: 45% if you're a "Basic Seller" y 20% if you're a "Premium Seller".

b) Si ya tienes una cuenta en TpT y quieres pasar a vendedor/a, tendrás que ir a "My TpT" y pinchar en "Become a Seller".

b) If you already have a TpT account and you want to upgrade to a seller membership, you have to go to "My TpT" and then click on "Become a Seller".


Aquí tendrás que rellenar datos personales y escribir tu email de PayPal de forma que se te hagan llegar los pagos. Pincha "UPGRADE" para terminar.

Here you will have to complete your personal information and write your PayPal email so that TpT can pay your Seller earnings. Click on "UPGRADE" to finish.


¡Ya tendrás tu cuenta como "TpT Seller"! Ahora tendrás que editar tu perfil para ponerle nombre a tu tienda, cambiar la imagen de perfil, añadir información sobre los recursos que compartirás... Todo ello lo puedes hacer yendo a tu nombre de usuario y pinchando en "Dashboard".

You will have now a "TpT Seller" account! Now you will have to edit your profile for changing the name of your shop, your profile picture, adding information about the resources you will share... All of that can be done by going to your username and clicking on "Dashboard".


Una vez aquí, tendrás que pinchar en "Edit Profile" y... ¡personalizar tu rinconcito TpT!

Once your here, you will click on "Edit Profile" and... personalise your little TpT corner!


¡Hasta aquí el tercer paso! Si queréis saber cómo personalizar vuestra tienda TpT para poder adaptarla a vuestros gustos e imagen que queráis, continuad al paso 4.
That's all for the third step! If you want to know how to personalise your TpT shop to be able to adapt it to your preferences and the image you like, continue to step 4.
  ¿Compartes ya tus materiales en TpT?
                     Do you share your ideas on TpT?

jueves, 16 de agosto de 2018

Guía TpT Guide ♥ 2

agosto 16, 2018 6
Guía TpT Guide ♥ 2

¡Hola, confettis!
En este post os explicaba qué es Teachers Pay Teachers (TpT) y cómo crear una cuenta solo para descargar materiales (TpT Membership). Hoy, os enseñaré cómo buscar y descargar materiales, tanto de pago como gratuitos. ¡Es muy fácil!

Hello, confettis!
In this post I explained what Teachers Pay Teachers (TpT) is and how to create an account for downloading activities only (TpT Membership). Today I'll show you how to look for and download both free and paid resources. It's super easy!

1. Buscar recursos / Look for resources

En tu página principal te aparecerán recursos sugeridos en base a lo que tú enseñes ("Resources you may like"). En la parte izquierda, a medida que bajas, verás los siguientes apartados:
♥ Trending this week - Los temas que más se han buscado a lo largo de la semana.
♥ Grades - Filtra por cursos.
♥ Subject - Asignatura.
♥ Prices - Precios (gratis, por debajo de $5, $5 a $10, más de $10 y en rebajas).
♥ Top resource types - Los recursos que más se buscan.

On your main page, you'll find suggested resources based on what you teach ("Resources you may like"). On the left side, as you scroll down, you'll see the following sections:
♥ Trending this week - Topics people have looked for over the week.
♥ Grades.
♥ Subject.
♥ Prices - free, under $5, $5 - $10, $10 and up, and on sale.
♥ Top resource types.


Si seleccionas, por ejemplo, "free", te aparecerán todos los recursos disponibles en la web que sean gratuitos.
If you click on, for example, "free", you will see all of the free resources that are available in the website.


Utilizando el buscador, puedes escribir aquello que quieras y encontrarás un montón de recursos relacionados con ello.
Using the search bar, you can write whatever you're interested in and you'll find a lot of resources related to it.


También puedes buscar el nombre de una persona que cree materiales e ir a su perfil para ver todo lo que ha subido.
You can also look for a creator's name and go to their profile to check everything that they have uploaded.


2. Descargar materiales gratuitos / Download freebies

Los materiales gratuitos son aquellos que ponen "free" a la derecha.
Freebies are those who have the word "free" on the right side.


Cuando hayamos encontrado el recurso que estábamos buscando, pincharemos encima de su nombre y nos llevará a la página donde descargarlo. Lo único que queda es pinchar en "Download Now" y... ¡listo!

Once we have found the resource we were looking for, we will click on its name and it will take us to a page where it can be downloaded. The only thing we have left is clicking on "Download Now" and... done!


3. Descargar materiales de pago / Download paid resources

Los materiales de pago tienen, en lugar de "free", su precio.
Paid materials have, instead of the word "free", its price.


Podríamos pinchar directamente sobre "ADD TO CART" para añadirlo a nuestro carrito o pinchar encima del nombre para ver su página y la descripción para asegurarnos de lo que vamos a comprar.

We could click directly on "ADD TO CART" or click on the name to see its page and its description in order to make sure of what we are buying.


Una vez tengamos los recursos que queremos en nuestro carrito, pincharemos en "Cart" para terminar con nuestra compra.

When we have everything we want in our cart, we will click on "Cart" and finish our shopping.


Nos dirigirá a nuestra compra en la que podremos ver si está todo correcto. Cuando lo tengamos todo, pincharemos en "CHECKOUT".

It will lead us to our shopping cart where we will check if everything is correct. Once we have everything, we will click on "CHECKOUT".

Solo nos quedará escoger el método de pago: tarjeta de crédito/débito o PayPal. Yo siempre utilizo PayPal porque me es más cómodo, pues no tengo que rellenar tantos datos, pero queda a vuestra elección. Además, en la parte derecha podéis aplicar si tenéis algún código de descuento, una tarjeta regalo o queréis gastar créditos TpT (ver siguiente punto).

The only thing that is left is the way of payment: credit/debit card or PayPal. I always use PayPal because for me it's easier, as I don't have to complete all my details, but you do you. In addition, on the right side you can apply any promo codes, gift cards or TpT credits (check next point) you have.


Si escogéis la opción de tarjeta tendréis que rellenar los datos que os pide y pinchar en "SUBMIT ORDER". Si elegís PayPal solo tendréis que darle al botón amarillo de "CHECK OUT WITH PayPal" y meteros en vuestra cuenta para autorizar el pago.

If you choose the card option you will have to complete all the information they ask for and click on "SUBMIT ORDER". If you choose PayPal you will only have to click on the yellow button that says "CHECK OUT WITH PayPal" and sign in for authorising the payment.


Una vez hayáis confirmado el pago, os redirigirá a esta página, donde tendréis que pinchar en "DOWNLOAD" para descargar el o los recursos que hayáis comprado.

Once you have confirmed the payment, you will be directed to the following page, where you will have to click on "DOWNLOAD" for downloading the resources you have purchased.


4. Créditos TpT / TpT Credits

¿Sabías que existen créditos TpT que puedes canjear por descuentos? Yo no tenía ni idea hasta que lo descubrí hace un mes. ¿Cómo se ganan? Cada vez que compres un material y luego puntúes y des tu opinión sobre él, obtendrás créditos TpT.

Did you know there are TpT credits you can redeem? I had no idea until I discovered it a month ago. How do you earn them? Every time you buy a resource and then you rate and comment about it, you will earn TpT credits.


Para ver cómo funcionan, tienes que ir a "My TpT" y pinchar en "TpT Credit Balance". Si quieres ver los créditos que tienes acumulados, pincha en "My TpT Credits Earned", y si quieres ver los que has gastado, pincha en "My TpT Credits Used".

In order to see how they work, you have to go to "My TpT" and click on "TpT Credit Balance". If you want to see how many you have, click on "My TpT Credits Earned", and if you want to check how many you've used, click on "My TpT Credits Used".


Por cada producto de $4.75 que comentes, recibirás 5 créditos, aunque también te dan créditos con compras de menor importe. ¡100 créditos son $5 que puedes descontar en una compra! Y no tienes que esperar a reunir los 100, puedes canjearlos antes si quieres.

For every $4.75 item you review, you will earn 5 credits. Every 100 credits is worth $5 you can apply on a purchase! And you don't have to wait until you have a 100, you can apply them before if you want.

*
¡Hasta aquí el segundo paso! Si queréis saber cómo convertiros en TpT sellers para poder compartir vuestros recursos en la web, continuad al paso 3.
That's all for the second step! If you want to know how to become a TpT seller to be able to share your resources on the web, continue to step 3.

  ¿Habéis descargado ya materiales en TpT?
                   Have you already downloaded TpT resources?