Colour me Confetti: ARTS
Mostrando entradas con la etiqueta ARTS. Mostrar todas las entradas

sábado, 12 de octubre de 2019

Globos aerostáticos ♥ Hot Air Balloons

octubre 12, 2019 0
Globos aerostáticos ♥ Hot Air Balloons
¡Hola, confettis!
En Arts nos encanta utilizar ceras porque son un material muy versátil que permite trabajar un montón de técnicas. Una de ellas es la que os traigo hoy: 💛 contraste de negro sobre un fondo lleno de color 💛

Hello, confettis!
In Arts, we love using wax crayons because they are a really versatile resource that allows us to work on a huge variety of techniques. One of them being the one I'm sharing today: 💛 contrast between black and a colourful background 💛


En este proyecto hemos utilizado los siguientes materiales:
↠ Folios.
↠ Ceras: negra, amarilla, naranja, roja, rosa, lila, azul claro, azul oscuro y verde.
↠ Punzón.

In this project we have used the following resources:
↠ Paper sheets.
↠ Wax crayons: black, yellow, orange, red, pink, lilac, light blue, dark blue and green.
↠ A punch.


Primero, cubrimos el fondo con colores vibrantes, asegurándonos de que no quedase nada del blanco del folio.

First, we covered the background using vibrant colours, making sure there was nothing left of the white of the sheet.


Después, vino el momento dramático: cubrir con cera negra TODO lo que habíamos pintado antes. Las caras de mis peques no tenían precio. Costó convercerl@s de que, al final, el resultado sería precioso.

Then, drama started: we had to cover EVERYTHING using the black wax crayon. My little ones' faces were priceless. It took a while to convince them the result would be worth it.


Por último, con un punzón, fueron quitando la capa de cera negra haciendo un dibujo de un globo aerostático. ¡Aquí ALUCINARON! La verdad es que quedaron muy bonitos. Además, si se equivocaban con el punzón, volvían a colorear con la cera negra a modo de "goma".

Lastly, using a punch, they removed the back layer drawing a hot air balloon. They were AMAZED! The truth is they look wonderful. Plus, if they made a mistake, they could colour it in with the black wax crayon as if it was a "rubber".


¡Así de preciosa luce nuestra galería de arte!              ♥             Our art gallery is ready to go!


Como veis, pueden dibujar lo que quieran y, ahora que Halloween está a la vuelta de la esquina, creo que esta técnica ofrece grandes posibilidades 👻

As you can see, they can draw whatever the like and, now that Halloween is around the corner, I think this technique is full of possibilities 👻

  ¿Habéis utilizado alguna vez esta técnica?
                       Have you ever used this technique?

martes, 30 de abril de 2019

Marcapáginas corbata ♥ Tie bookmarks

abril 30, 2019 0
Marcapáginas corbata ♥ Tie bookmarks
¡Hola, confettis!
El 23 de abril fue el Día Internacional del Libro y, para celebrarlo, estuvimos leyendo Harry Potter y la piedra filosofal con nuestras mantas. Y, como no podía ser de otra manera, hicimos unos marcapáginas perfectos para trabajar la motricidad fina y el manejo de la regla. Se encajan en la esquina de cada hoja y los diseñamos a modo de la corbata de cada una de nuestras casas. ¿Quieres saber cómo las hemos hecho? ⇩

Hello, confettis!
World Book Day was the 23rd of April and, in order to celebrate it, we read Harry Potter and the Philosopher's Stone in our blankets. And, of course, we designed various bookmarks perfect for working on fine motor skills and handling the ruler. They fit in the corner of a given page and we cut them out as a tie. Do you want to know how we've made them? ⇩


En este proyecto hemos utilizado los siguientes materiales:
↠ Cartulinas: roja, azul, verde, amarilla, morada y negra.
↠ Goma eva: dorada y plateada.
↠ Lápiz.
↠ Goma.
↠ Pegamento.
↠ Tijeras.
↠ Regla.
↠ Rotuladores.

In this project we have used the following resources:
↠ Card: red, blue, green, yellow, purple and black.
↠ Eva rubber: gold and silver.
↠ Pencil.
↠ Rubber.
↠ Glue.
↠ Scissors.
↠ Ruler.
↠ Markers.


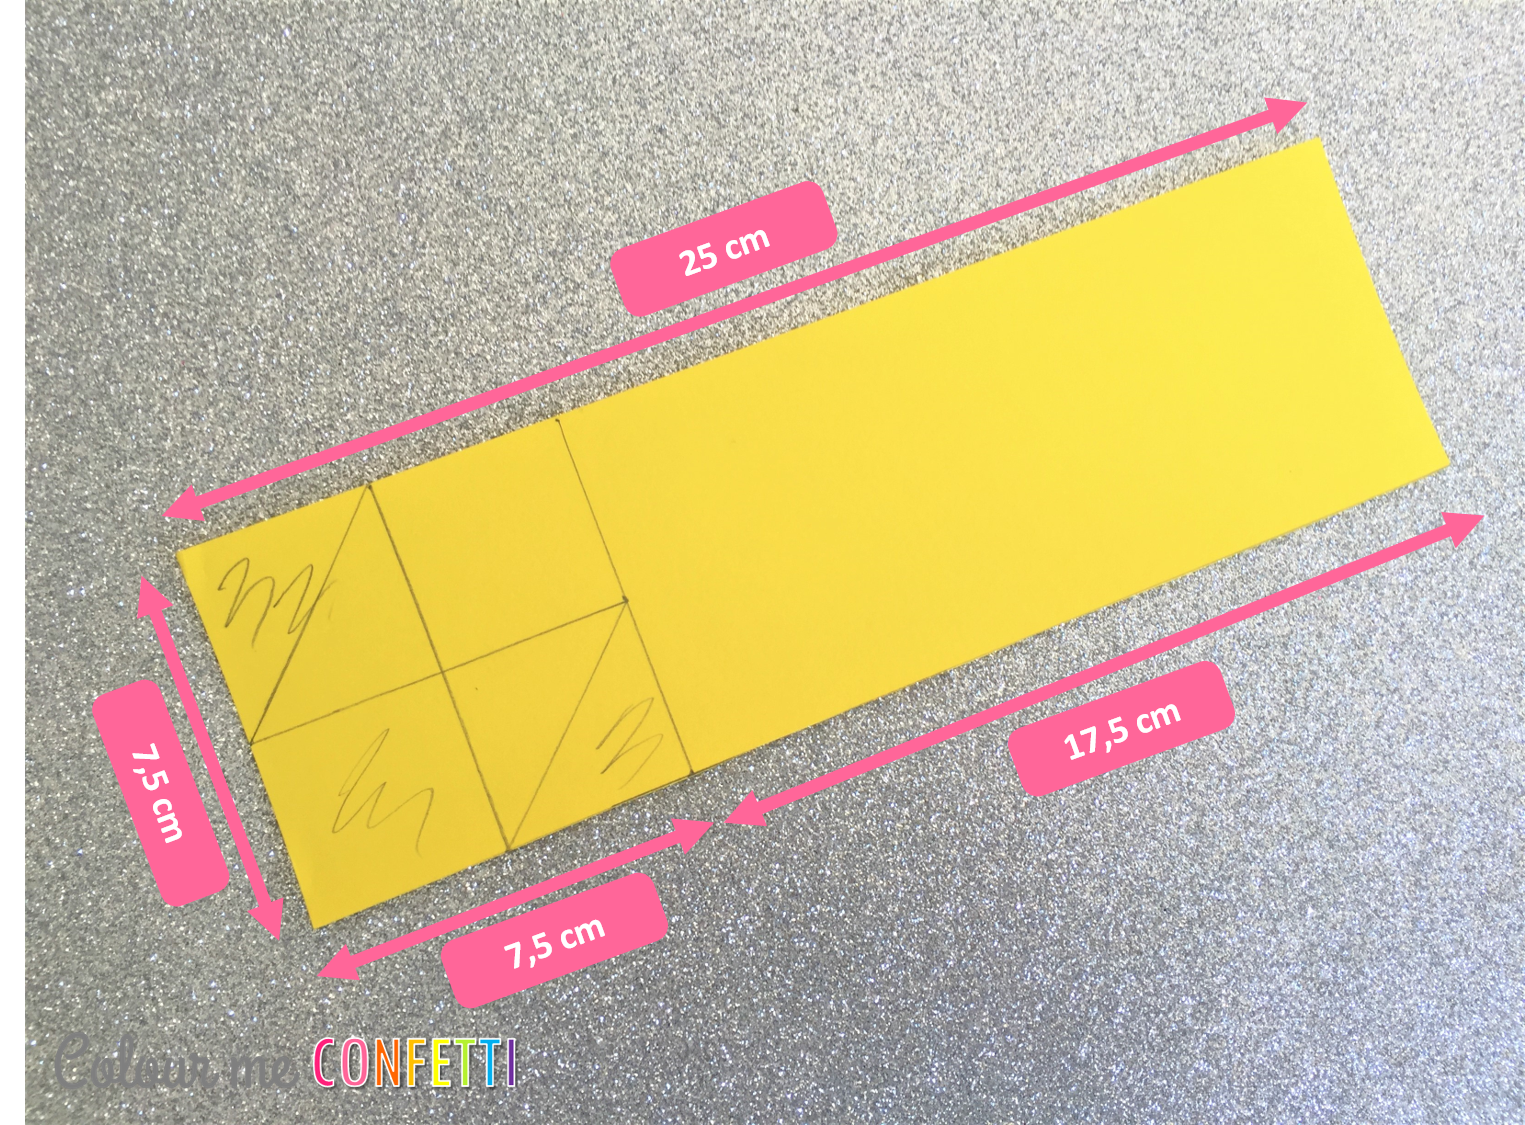
Les entregamos un rectángulo (7,5 cm x 25 cm) y, con la regla, trazaron un cuadrado. Lo dividieron en cuatro partes iguales y luego unieron las esquinas dos a dos. Tacharon aquellos trozos que iban a tener que recortar.

We gave them a rectangle (7,5 cm x 25 cm) and, using a ruler, they traced a square. They divided it into four equal parts and, then, connected the corners. They crossed out the areas that had to be cut out.


Una vez recortaron todo, les quedaron dos piezas: un rectángulo y una especie de flecha. Cogieron la flecha, y pegaron las dos solapas entre sí, creando un pequeño bolsillo.

Once they cut everything out, they had two pieces left: a rectangle and something similar to an arrow. They took the arrow and glued the flaps together, creating a little pocket.


Después, trazaron la silueta del bolsillo en el rectángulo y dibujaron la corbata (a 13 cm del borde).
Then, they traced the silhouette of the pocket onto the rectangle and drew the tie (13 cm from the top).


Luego lo recortaron, obteniendo así las dos partes de la corbata.
They cut it out, obtaining the two parts of the tie.


Pegaron el bolsillo a la corbata y por la parte de atrás escribieron "World Book Day 2019" y su nombre.
They glued the pocket to the tie and they wrote "World Book Day 2019" and their name at the back.


El toque final lo dieron utilizando goma eva para hacer las rayas de la corbata.
The final touch was given by using eva rubber to add the stripes to the tie.


¡Así de bonitos quedaron!              ♥             They turned out beautiful!


La idea original es de Demi Siriusly y podéis encontrar el tutorial aquí:
The original idea is from Demi Siriusly and you can find the tutorial here:


  ¿Qué actividades hacéis por el Día del Libro?
                       What activities do you do for World Book Day?

viernes, 5 de abril de 2019

Girasoles ♥ Sunflowers - Van Gogh

abril 05, 2019 0
Girasoles ♥ Sunflowers - Van Gogh
¡Hola, confettis!
A lo largo del tercer trimestre, vamos a realizar un nuevo proyecto de Arts centrado en aprender todo sobre grandes artistas. Con la entrada de la primavera, no nos hemos podido resistir y... ¡ya hemos empezado! El primero ha sido Van Gogh con sus girasoles. Pero, como no podía ser de otra manera, le hemos dado nuestro toque ¡en 3D!

Hello, confettis!
Throughout the third term, we're going to carry out a new Art project, focused on learning everything about outstanding artists. With the beginning of Spring, we couldn't resist and... we've already started! The first one has been Van Gogh with his sunflowers. But, we have given them our own twist in 3D!


En este proyecto hemos utilizado los siguientes materiales:
↠ Folios.
↠ Tijeras.
↠ Celo y pegamento.
↠ Papel crepé: amarillo, naranja, marrón y verde.
↠ Ceras.
↠ Rotuladores.

In this project we have used the following resources:
↠ Paper sheets.
↠ Scissors.
↠ Tape and glue.
↠ Crepe paper: yellow, orange, brown and green.
↠ Wax crayons.
↠ Markers.


Paso 1: enrollamos dos mitades de folio y las coloreamos de verde para hacer los tallos.
Step 1: roll two halves of a paper sheet and colour them green in order to make the stems.


Paso 2: dibujamos el jarrón en otra mitad de folio y lo recortamos.
Step 2: draw the vase in another half of paper sheet and cut it out.


Paso 3: hacemos los girasoles con cuadrados de papel crepé de distintos colores. Doblamos todos los papeles, los grapamos en el centro y vamos abriendo los pétalos.
Step 3: we make the sunflowers using squares of crepe paper. Bend all the papers together, staple them in the middle and open the petals.


Paso 4: dibujamos el fondo utilizando ceras.
Step 4: draw the background using wax crayons.


Paso 5: pegamos todo al fondo utilizando celo y pegamento de barra.
Step 5: glue everything together using tape and glue.


                       ¡Ya tenemos nuestra galería de arte lista!              ♥             Our art gallery is ready to go!

  ¿Qué cuadros de Van Gogh habéis trabajado?
                       Which Van Gogh paintings have you worked on?

domingo, 24 de febrero de 2019

100 días en el cole ♥ 100 days in school

febrero 24, 2019 0
100 días en el cole ♥ 100 days in school
¡Hola, confettis!
Esta semana hemos celebrado que ya llevamos 100 días en el colegio. Es una práctica que vi a varias profes de EEUU y que me encantó. ¡Mirad cómo lo hemos llevado a cabo!

Hello, confettis!
This week we have celebrated our 100th day in school. I saw a bunch of US teachers celebrate it and I loved the idea. Look at how we have done it!


A principio de curso, colocamos estos posters en los que fuimos tachando uno a uno los días que íbamos al colegio. Así, hablábamos de cuántos días quedaban hasta el 100 y trabajamos el cálculo mental y los conceptos de unidad, decena y centena.

At the beginning of the school year, we put up these posters in which we crossed out one by one the days we were in school. That way, we talked about how many days were left until the 100th one while working on mental math and on ones, tens and hundreds.


Los posters que utilizamos lo podéis descargar de forma gratuita pinchando en la imagen correspondiente.
You can download the posters we use for free by clicking on the corresponding image.

ESPAÑOL

ENGLISH

Cuando llegó el día 100, hicimos una máquina de chicles utilizando:
↠ Plantilla impresa en cartulina blanca.
↠ Ceras.
↠ Tijeras.
↠ Vaso de papel.
↠ Pegamento.

When the 100th day arrived, we created a gumball machine using:
↠ Template printed in white card.
↠ Wax crayons.
↠ Scissors.
↠ Paper cups.
↠ Glue.


Para ello, solo tuvimos que dibujar 100 bolas de chicle de distintos colores dentro del círculo con ceras. También coloreamos de negro la rosca y el agujero por donde salen los chicles.

For making them, we only had to draw 100 gumballs in different colours inside the circle using wax crayons. We also coloured in the handle and the hole where the gum comes out.


A continuación, hicimos un corte en la base del vaso lo suficientemente profundo para que se sujetase el círculo y pegamos la rosa y el agujero.

Then, we made a cut at the base of the cup deep enough for the circle to hold up and we glued the handle and the hole to the cup.


Por último, solo tuvimos que montarlo todo y ¡nuestras máquinas de chicles estuvieron listas!
Finally, we only had to put everything together and our gumball machines were ready!


Idea original: K Teacher Tiff
Original idea: K Teacher Tiff

  ¿Celebrasteis 100 días en el cole?
                       Did you celebrate 100 days in school?

jueves, 14 de febrero de 2019

AMOR ♥ LOVE

febrero 14, 2019 0
AMOR ♥ LOVE
¡Hola, confettis!
Aquí vengo con otro proyecto de Arts, esta vez utilizando la regla para trabajar los colores cálidos y fríos por San Valentín.

Hello, confettis!
Here I am with another Art project, this time using the ruler in order to work on warm and cool colours for Valentine's Day.


En este proyecto hemos utilizado los siguientes materiales:
↠ Folios.
↠ Un lápiz.
↠ Una goma.
↠ Una regla.
↠ Ceras.

In this project we have used the following resources:
↠ Paper sheets.
↠ A pencil.
↠ A rubber.
↠ A ruler.
↠ Wax crayons.


Comenzamos dividiendo el folio en cuatro partes iguales. Como veis, yo en la pizarra les fui escribiendo las distancias a las que tenían que ir poniendo las marcas. Al principio nos llevó mucho tiempo, pero en cuanto le cogieron el "truco" a la regla, ¡todo fue rodado!

We started by dividing the paper sheet into four equal parts. As you can see, I wrote the distances in the whiteboard for them to have a reference. At first, it took us a long time but, as soon as they got used to the ruler, everything ran smoothly!


Para hacer las letras, empezamos primero con puntos en las esquinas y luego los unimos entre ellos. Después, trazamos las líneas del fondo (verticales, horizontales, diagonales y en zig zag).

For making the letters, we started first drawing little dots on each corner and then we joined them. Later, we traced the lines in the background (vertical, horizontal, diagonal and zigzag).


Por último, coloreamos nuestras obras de arte siguiendo una condición: dos letras tenían que seguir tonos cálidos y las otras dos fríos.

Lastly, we coloured our masterpieces following one standard: two letters had to follow warm tones and the other two cool ones.


¡Así de bonitos quedan en nuestra galería de arte!              ♥             Look how wonderful they look in our Art Gallery!


  ¿De qué formas utilizáis la regla en clase?
                       How do you use the ruler in class?

viernes, 1 de febrero de 2019

Mariposas simétricas ♥ Symmetrical butterflies

febrero 01, 2019 0
Mariposas simétricas ♥ Symmetrical butterflies
¡Hola, confettis!
Hoy os quiero enseñar una manualidad que hemos llevado a cabo para trabajar los invertebrados y la simetría. Se trata de ¡estas mariposas superchulis! Antes vimos distintos tipos de mariposas y alucinamos con sus colores, sus reflejos... ¡incluso parecía que algunas tenían ojos! Si es que, como dijo un peque, tener tantos depredadores hace que tengas que tener ojos hasta dibujados. ¡Vamos a ver cómo las hemos hecho!

Hello, confettis!
Today I want to share a craft we've carried out in order to work on invertebrates and on symmetry. They are these super cute butterflies! Before making them, we took a look at various types of butterflies and we were amazed by their colours, reflections... some even seemed to have eyes! As one of my little ones said, when you have so many predators you need to have even drawn eyes. Let's see how we made them!


En este proyecto hemos utilizado los siguientes materiales:
↠ Cartulina azul.
↠ Un lápiz.
↠ Una goma.
↠ Pintura acrílica.
↠ Pinceles.

In this project we have used the following resources:
↠ Blue card.
↠ A pencil.
↠ A rubber.
↠ Acrylic paint.
↠ Paint brushes.


Para hacerlas, doblamos las cartulinas a la mitad para crear un eje. Dibujamos la mitad de una mariposa en un lado de la cartulina y la pintamos con los colores que más nos gustaban.

In order to make them, we folded the cards in half for creating an axis. We draw half of our butterfly on one side of the card and we painted it however we wanted.


Después, doblamos la cartulina de nuevo y, cuando la volvimos a abrir... ¡mirad qué obras de arte habíamos creado! 

Then, we folded the card again and when we opened it up... look at the masterpieces we had created!


Como habéis visto, son muy sencillas de hacer y sirven para trabajar el concepto de simetría de una forma muy manipulativa y visual.

As you've seen, they're very easy to make and they're perfect for working on the concept of symmetry in a very manipulative and visual way.


  ¿Cómo trabajáis la simetría?
                       How do you work on symmetry?